
Sometimes you may need to show someone what is displayed on your screen, but what do you do when that person is not nearby? That is when a screenshot can come in handy. Screenshots are a good way to demonstrate a problem or share content that cannot be shown another way. Follow these steps for instructions on taking a screenshot on your Windows PC or Mac computer.
NOTE: If you request assistance from Online Help or the IT Help Desk you may be asked to provide a screenshot to help illustrate the problem. Screenshots can often help to get your problem fixed as quickly as possible.
Windows PC
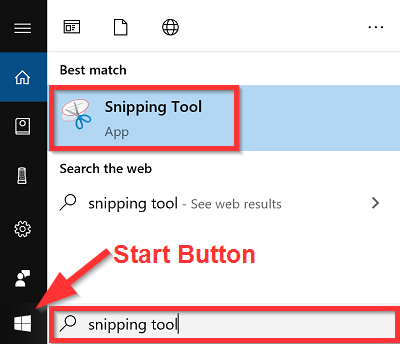
- Open the Snipping Tool program on your computer. If you cannot find it, search for "Snipping Tool" from the Windows Start Button.
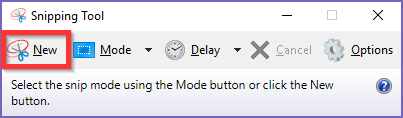
- Click on the New button to capture a new screenshot, it has an icon with a pair of scissors.
- The screen will lighten and the cursor will turn into a crosshair icon. Draw a box around the area you wish to take a screenshot of by clicking-and-dragging on your screen.
- When you let go of the mouse button the screenshot will now be inside of the Snipping Tool.
- Click the copy button or use the copy shortcut, Ctrl+C.
- Switch to the program you want to put the screenshot into, like Word or your email, and use the paste button or paste shortcut, Ctrl+V.
Mac Computer
- Hold the Shift + ⌘ (command) keys and then tap the number 4 key. The cursor will turn into a crosshair icon.
- Draw a box around the area you wish to take a screenshot of by clicking-and-dragging on your screen.
- A little picture of the screenshot will appear in the lower right corner, click it to open it then click Done in the in the upper right corner of the screenshot window.
- Your screenshot will be saved as an image file on your Desktop with the name "Screen Shot" followed by the date and time it was created.