
This article will cover the steps to access, view, and share a recorded Teams meeting. Some of the steps and options in this article will only be visible to the meeting organizer.
Recording a Meeting
As the meeting organizer, you can set a meeting to be automatically recorded when
creating the meeting, or enable and disable recording during the meeting.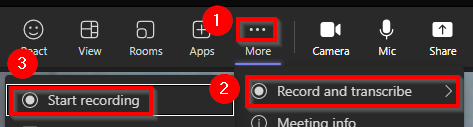
To start or stop recording during a meeting, click on "More" then click on "Record and transcribe" and then click on "Start/Stop recording".
Locating a Meeting Recording
If the meeting was associated with a Microsoft Teams team channel, the recording will be automatically posted to that channel and accessible to all channel members. Otherwise, you can access a recorded meeting by viewing the meeting chat in the "Chat" panel, or by accessing the meeting details on your calendar in Teams.
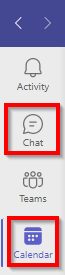
Click to open either the "Chat" or "Calendar" panel.
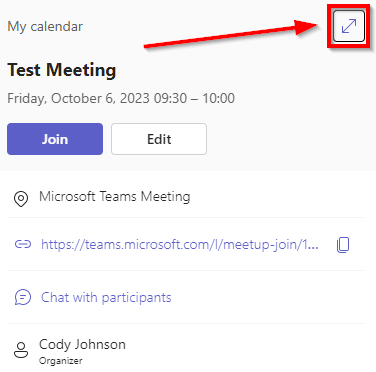
In the "Calendar" panel, click on the meeting on your calendar and then click on the icon in the top right corner to access the meeting details.
In the "Chat" panel, simply click on the chat associated with your meeting.
Viewing the Meeting Recording
Once you have located the recording, you can view it by clicking on the recording in the "Chat" or "Meeting Details" panel.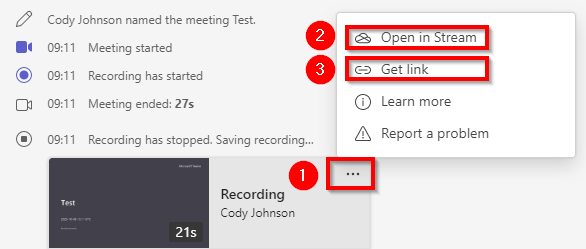
You can also click on the "..." icon, and then click on "Open in Stream" to view the recording in your web browser. Clicking on "Get link" will generate a shareable link for others to access the recording.
If you are not the organizer, you may not see this option.
The recording will have standard video controls for playing/pausing, adjusting quality, and changing the volume.
Recordings are not always available right after a meeting has finished. It takes time for Microsoft to prepare and upload the recording. If you don't see the recording yet, or clicking on the recording doesn't allow you to view it, please wait a while for the recording to become ready. The time it takes is proportional to the length of the recording.
Downloading a Copy of the Recording
You can download a copy of the recording using one of several methods. If you are the meeting organizer, the recording's video file will automatically be saved to the "Recordings" folder
in your OneDrive under the default settings. In other cases, you can download a copy
of the recording by accessing the "Files" tab associated with your meeting.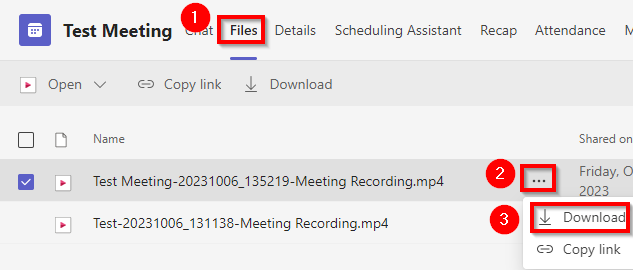
Click on the "Files" tab, then click on the "..." icon next to the recording you would like to download, and then click on "Download".
There can be multiple recordings available for each meeting if the recording is started and stopped multiple times. Other files shared during the meeting will be accessible in this tab as well.
You can also download the file when viewing the recording in your web browser.
Click on the "..." icon and then click on "Download".
Change a Recording's Expiration Date
By default, recordings will expire and be deleted after 120 days. Downloaded copies will not expire. As the meeting organizer, you can change this setting by accessing the file through your web browser using the methods listed above.
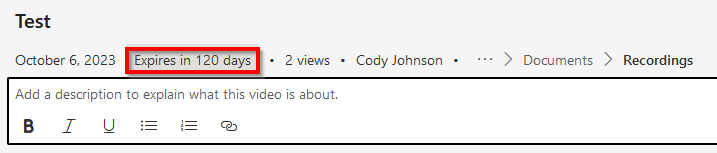
Once you have the recording open in your web browser on the Microsoft Stream platform,
you can click on the "Expires in..." message to change when the video expires.